Removing Noise from your Photos
Removing Noise from your Photos
By Jenn Mishra, Instructor St. Louis School of Photography
Sometimes you can’t help but photograph using high ISOs. I tend to up my ISO when I’m photographing motion in low light. But higher ISOs create digital noise, which looks a bit like static across your photo. Digital cameras are increasing the clarity of their images all the time. But if you have pictures with a lot of noise there are noise reduction programs that help clean your images.
Let me show you how to clean noise in Lightroom Classic. Then I’ll show you one of the noise reduction plug-ins available.
It’s best if you follow along. Find an image in your collection that has a lot of noise. Look for that was taken at over 3200 ISO. Even the best cameras will start introducing visible noise at that point. If you have one taken at 5000 or 6400 ISO, you’ll really see the difference.
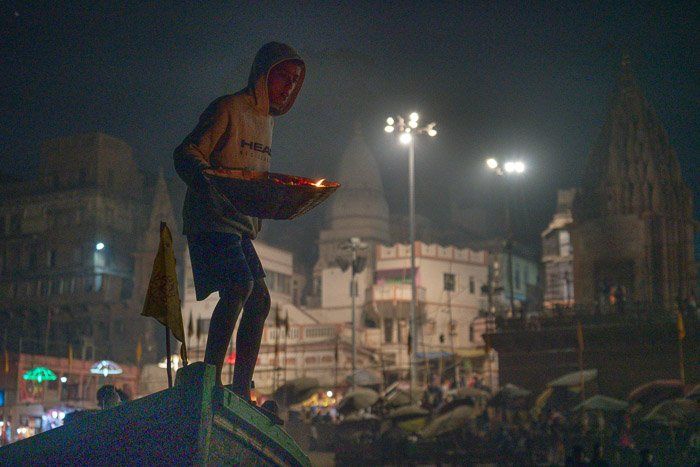
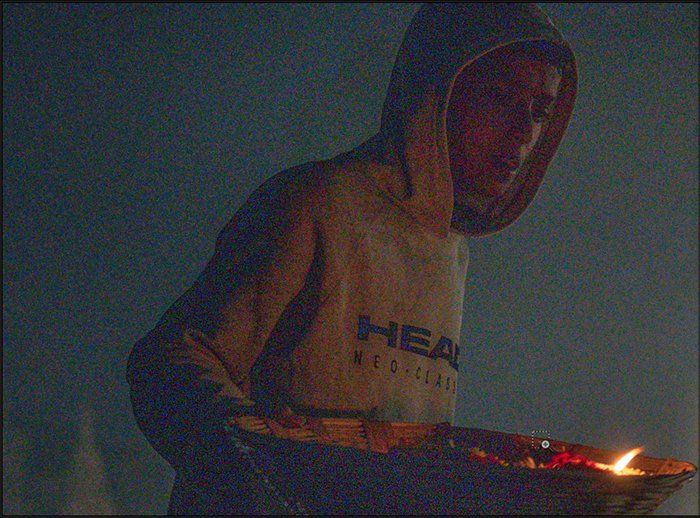
I chose a photo I took in Varanasi, India. It was dark and this boy was hopping from boat to boat selling candles during a ceremony. I was in one of the boats, so not that stable myself. My settings were f/4.5 at 1/160th of a second, ISO 6400. I shoot with a Sony A7R3. With this lens, I was wide-open and I had lowered my shutter speed as much as I dared to capture motion. The only setting I had left was ISO. I raised it to 6400 to capture the brightest shot possible under the circumstances.
1 Mishra.No.Noise Reduction,.jpg
CAPTION: Original picture of a boy in Varanasi, India selling ceremonial candles showing digital noise. f/4.5 @ 1/160th, ISO 6400.
What is Noise?
Let’s zoom in close to see the noise in this photo.
There are two types of noise: luminance and chroma. Luminance noise is what we generally think of when we talk about noise. It looks like bright spots of light where there shouldn’t be. Chroma noise has to do with color. With chroma noise, you’ll see colored pixels where they shouldn’t be. I tend to see the red ones. This image is so noisy that all I can see are colored pixels where they shouldn’t be.
2.Mishra.noise.zoom copy
CAPTION: Close-up showing luminance and chroma noise.
How to Reduce Noise in Lightroom
Let’s see what we can do about the noise.
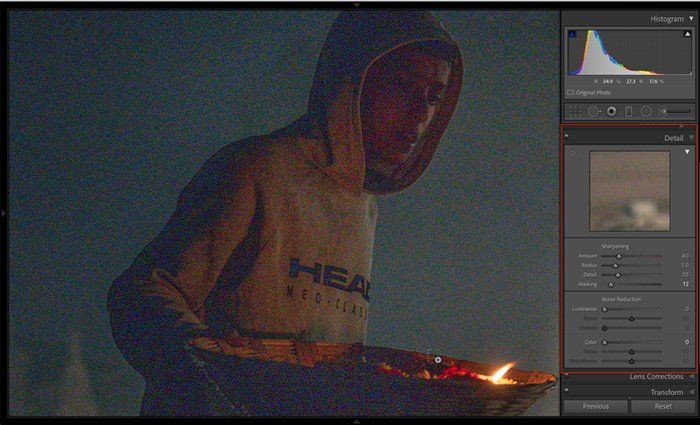
Go to the Develop Module in Lightroom and open the Detail panel. If you’ve not been here before this is where you find the sharpening and noise reduction tools. Right now I have both the Luminance and Color sliders at 0. Lightroom sometimes applies a bit of noise reduction automatically so yours may be at 25 by default.
3.Mishra.noise.zoom copy 2.jpeg
CAPTION: Screenshot showing noise reduction tools in Lightroom Classic.
Move the sliders to the right to add noise reduction. The other sliders under Luminance and Color help you refine the noise reduction.
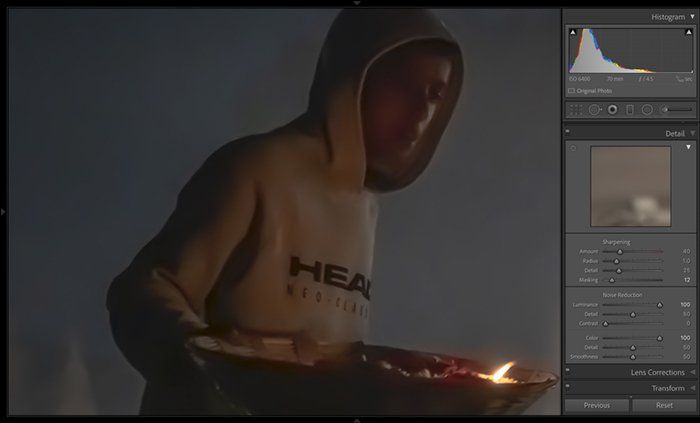
There are two problems with noise reduction programs. They sometimes can’t find the noise. They can’t tell the difference between good pixels and bad. But sometimes they go too far and start blurring edges. You can easily lose detail in your image and make it look artificial and waxy. I’ll push both Luminance and Color sliders to 100 and show you what I mean.
4.mishra.zoom.noise.reduction.maximum
CAPTION: Screenshot showing the result of maximum noise reduction in Lightroom Classic.
Removing noise from your image is a balancing act between removing noise and retaining detail. Adobe puts the sharpening tool in Lightroom right next to the noise-reducing tool for a reason. As you move sliders may want to add a little sharpening. A lot of this is a personal preference. Some photographers like their images smoother; others are ok with a bit of noise if it helps keep their subject sharp.
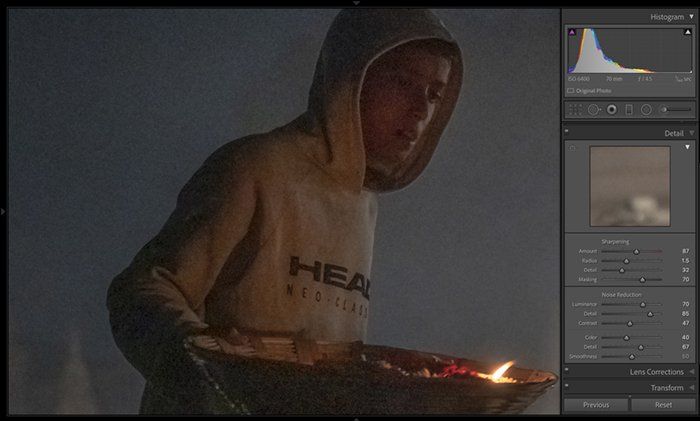
5.mishra.zoom.noise.reduction.jpg
CAPTION: Screenshot showing optimum noise reduction in Lightroom Classic
Lightroom does an ok job of removing noise. For most photos, the Lightroom tool works fine. But there are better noise reduction programs on the market. You should know about these if you want to take noise reduction a step further.
Topaz DeNoise AI
Many of the programs work as plug-ins for Lightroom and Photoshop. You can open your image in the plug-in, reduce noise, and save your image back to your Lightroom catalog. Let me show you one of the most popular programs: Topaz DeNoise AI.
There’s a free trial download if you want to follow along. Go to www.topazlabs.com/denoise-ai. You can decide later whether you want to buy the program at $79.99.
To open the image in DeNoise AI, go to the Photo drop-down menu and select Photo > Edit In > Topaz DeNoise AI. If you round-trip your images into Photoshop for editing, this will feel familiar. Select “Edit a Copy with Lightroom Adjustments” and click OK. DeNoise gets right to work analyzing the image for noise. The original image is on the left side of the screen and a noise reduction preview is on the right.
There are three different modes: DeNoise AI, AI Clear, and Low Light. I’ll try each of these to see which does a better job on my image. As with Lightroom, the noise reduction tools let you refine the noise reduction and sharpen details to your liking. In the end, I opted for the DeNoise AI mode and tweaked the sliders to remove more noise and enhance sharpness.
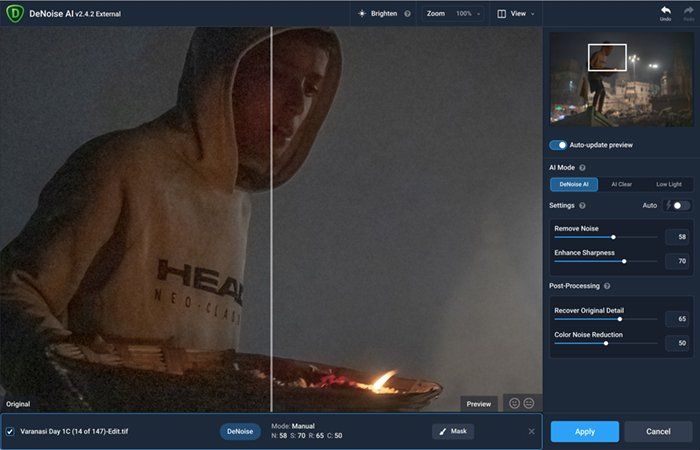
6.Mishra.zoom.denoise.jpg
CAPTION: Screenshot showing before and after noise reduction in Topaz DeNoise AI.
Conclusion
With the noise reduction software on the market, there is no fear of raising your ISO to capture an image. You can remove most of the noise in post-processing. Lightroom will work well for light noise reduction, but plug-ins like Topaz DeNoise AI take noise reduction a step further. In this case, the results for both Lightroom and DeNoise AI were similar. But overall, DeNoise is a more powerful tool.

7.Mishra.noise.reduction.Comparision.jpg
CAPTION: Noise reduction comparison showing before noise reduction (left), noise reduction with Lightroom Classic (middle), and noise reduction with Topaz DeNoise AI (right).
In this article, I showed you the noise reduction tools in Lightroom Classic and Topaz DeNoise AI. But there are other products on the market. Capture One Pro has the best internal noise reduction tool. If you’re looking for a plug-in, Noiseware, and Neat Image work as well as DeNoise. Neat Image is less expensive and once you become familiar with the interface, it moves at lightning speed.